CONDITIONS |
|||||||||||||||||||
|
On a 25-meter firing range, given an M16A1
rifle, 18 rounds of 5.56-mm ammunition, a 250-meter zero
target, and sandbags for support. | |||||||||||||||||||
STANDARDS |
|||||||||||||||||||
| Using 18 rounds or less, the soldier must battlesight zero his rifle by achieving five out of six rounds in two consecutive shot groups within the 4-centimeter circle. Bullets that break the line of the 4-centimeter circle will be used in evaluating the soldier's performance. | |||||||||||||||||||
TRAINING AND EVALUATIONTraining Information Outline |
|||||||||||||||||||
| 1. The M16A1 rifle has two adjustable sights. Elevation adjustments are made on the front sight, and windage adjustments are made on the rear sight. | |||||||||||||||||||
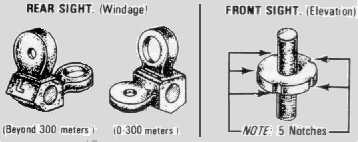
| 2. The standard sight system (Figure 100). | |||||||||||||||||||
| a. The rear sight has two parts: an aperture marked "L" for ranges beyond 300 meters and an unmarked aperture for ranges from 0 to 300 meters (when zeroing with the standard sight, use the aperture marked "L"), and a windage drum for windage adjustments. | |||||||||||||||||||
| b. The front sight consists of a rotating sight post with a spring-loaded detent. | |||||||||||||||||||
|
3. Adjust sights (Figure 101). a. Rear sight. To adjust windage, depress detent and rotate drum to desired direction. To move point of impact to right, turn drum clockwise in direction of arrow and letter R. To move left, move drum counterclockwise. Each graduation (notch) moves the point of impact of bullet as indicated in Table 4.
| |||||||||||||||||||
| |||||||||||||||||||
| b. Front sight. To adjust elevation, depress detent and rotate post. To raise strike of bullet, rotate post in the direction of arrow marked UP. Reverse the direction of rotation to lower strike of bullet. | |||||||||||||||||||
|
4. Battlesight zero
the weapon. Note: The "L" marked aperture is used to zero the M16A1 rifle on the 25-meter range. Once the zeroing is complete, flipping the sight to the unmarked aperture will cause the sights to be zeroed for 250 meters. Flipping the sight back to the "L" marked aperture will automatically extend the zero to 375 meters without additional adjustments to the front sight post. | |||||||||||||||||||
| a. Sight picture. In aiming, you are concerned with correctly pointing your rifle so the bullet will hit the target when you fire. To do this, you must have the rear sight, the front sight post, and the target or aiming point in their proper relationship. This is known as sight picture. A correct sight picture is obtained when the sights are aligned and the aiming point (target) is in the correct relationship to the front sight post (Figure 102B). Sight picture includes two basic elements: sight alignment and placement of the aiming point. | |||||||||||||||||||
|
b. Sight alignment. To obtain correct sight alignment, align
the sights as shown in Figure 102A. Notice that the
top center of the front sight post is in the center of
the rear sight aperture. If an imaginary horizontal
line were drawn through the center of the rear sight
aperture, the top of the front sight post would touch
this line. If an imaginary vertical line were drawn
through the center of the rear sight aperture, the line
would bisect the front sight post. You ensure that
you have sight alignment by concentrating your attention
and focusing your eye on the top of the front sight post
through the blurred rear sight aperture. By doing
this, you can detect and correct any errors in sight
alignment.
| |||||||||||||||||||
| |||||||||||||||||||
| c. Placement of the aiming point. The aiming point (target on which the firer has aligned his rifle sights) is correctly placed when it is on center of mass of the 250-meter scaled silhouette of the 25-meter target (Figure 102C). If the aiming point is correctly positioned, an imaginary vertical line drawn through the center of the front sight post will appear to split the aiming point. | |||||||||||||||||||
| d. Battlesight zero target. Use the standard 25-meter target (Figure 103) when determining the battlesight zero for the M16A1 rifle. Vertical and horizontal lines are printed on the target with a number value given to each. It also has pictures of front and rear sights with a direction arrow to show which direction to turn the given sight when making adjustments. When firing at this target, aim center of mass and adjust sights to bring the shot groups to the center of the silhouette and within the 4-centimeter circle. | |||||||||||||||||||
| e. Sight adjustments. If the battlesight zero has not been previously determined, place the M16A1 sights in the starting position. | |||||||||||||||||||
| (1) Set the front sight post so that the base of the post is flush with the top of the front sight post well, then go clockwise for 11 clicks. | |||||||||||||||||||
| (2) Center the rear sight aperture within the rear sight housing by moving the rear sight all the way to the left, then moving it 17 clicks to the right. | |||||||||||||||||||
|
(3) With the sights in the starting position, fire
a three-round shot group. Once a shot group of 4
centimeters or less is achieved, adjust the sights to
move the shot group to within the zero circle.
| |||||||||||||||||||
Download Printable Target (Right Click, then click SAVE AS) NOTE: Full size of target is 8.5 x 11 inches
| |||||||||||||||||||
| (4) Find the horizontal (right-to-left) line nearest the center of the shot group. Follow the line left or right to the nearest edge of the target. Move your front sight by number of clicks marked on that target line by turning the front sight in the direction of the arrow in the front sight figure nearest the center of the shot group. | |||||||||||||||||||
| (5) Find the vertical (up-and-down) line nearest the center of the shot group. Follow that line to the top or bottom of the target, whichever is nearest. Move the sight by number of clicks marked on that target line by turning the rear sight drum in the direction of the arrow in the rear sight figure nearest the center of the shot group. | |||||||||||||||||||
| f. Determine the battlesight zero. Determine the 250-meter battlesight zero by firing a series of three-round shot groups at the 25-meter target. Aim at the center mass of the 250-meter scaled silhouette and adjust your sights until the center of this acceptable shot group is within the 4-centimeter circle that appears on the target. | |||||||||||||||||||
| 5. Upon completion of zeroing, the battlesight setting should be determined and recorded. There are two methods that can be used to determine how many clicks up or down and left or right the sights were moved from the base settings. | |||||||||||||||||||
|
CAUTION AFTER THE INITIAL DETERMINATION OF SIGHT SETTING, THE FOLLOWING PROCEDURES FOR DETERMINING THE BATTLESIGHT ZERO SETTINGS FOR THE FRONT AND REAR SIGHTS OF THE M16A1 RIFLE WILL BE DONE ONLY WHEN DOUBT EXISTS AS TO WHETHER THE SIGHTS ARE PROPERLY SET. CONTINUAL CHANGING OF THE SIGHTS MAY CAUSE DAMAGE | |||||||||||||||||||
| a. Record as changes are made. To do this, the firer starts with both sights set at zero (base settings). A three-round shot group is fired, and the sights are changed as indicated by the numbers and pictures on the target. These changes are recorded on a piece of paper as they are made. This procedure continues until a good battlesight zero is obtained. | |||||||||||||||||||
| EXAMPLE: The firer has recorded the following corrections: | |||||||||||||||||||
| |||||||||||||||||||
| By adding all the RIGHT corrections and all LEFT corrections, then subtracting the smaller number from the larger number will give the proper correction. | |||||||||||||||||||
| |||||||||||||||||||
| The same procedure is repeated for the front sight by adding all the UP corrections and all the DOWN corrections and subtracting the smaller from the larger number. | |||||||||||||||||||
| |||||||||||||||||||
|
Note: When subtracting LEFTs and RIGHTs, and UPs and DOWNs, the
remainder will carry the sign of the larger number.
b. Determine changes after zero. The firer will complete the battlesight zero, making changes as required after each shot group is fired. Upon completion of zeroing, the firer must determine the number of clicks he moved the sight. (1) To do this, he looks at the rear sight and determines which way he must move the rear sight to place it back on center. After looking at the rear sight, the firer determines the rear sight is to the left of center. In order to bring it back to center, he must move it to the right. He carefully moves the sight to the right one click at a time, keeping track of the number of clicks to bring it to center. EXAMPLE: The rear sight was moved five clicks to the right to bring it back to center. The zero for the rear sight is, therefore, "left five clicks". (2) To determine the zero for the front sight, use the same procedure: determine which way the sight post must be turned to bring it back to even (base setting). Carefully turn the front sight post one click at a time until the base is even with the top of the sight post well. EXAMPLE: The sight post base is above the top of the sight post well. Since the sigth post has a right-hand thread, the sight post must be turned to the right to lower the sight. The sight post was lowered four clicks; therefore,the zero is "up 4 clicks". The battlesight zero for this rifle is "left 5 clicks" and "up 4 clicks".
6. Upon obtaining the battlesight zero, the
firer should record the data on a piece of tape and secure it to the rifle. By doing this,
should the sights be changed during cleaning, the sights
can be returned to the battlesight setting. |


