|
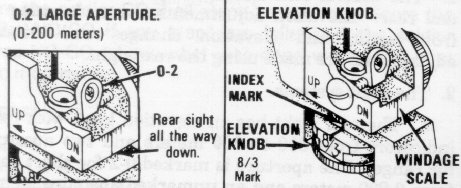
Figure 104. Rear sight.

|
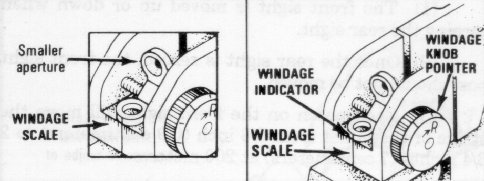
Figure 105. Unmarked aperture. Figure 106. Windage knob.

|
CONDITIONS |
|
On a 25-meter range, given an M16A2 rifle, 18 rounds of 5.56-mm ammunition, a 300-meter zero target, and sandbags for support.
|
STANDARDS |
|
Using 18 rounds or less, the soldier must battlesight zero his rifle by achieving five out of six
rounds in two consecutive shot groups within the 4-centimeter circle. Bullets that break the line of
the 4-centimeter circle will be used in evaluating the soldier's performance.
|
TRAINING AND EVALUATIONTraining Information Outline |
| 1. The M16A2 rifle has two adjustable sights -- front and rear. Elevation adjustments are made using the front sight, and elevation changes and windage adjustments are made using the rear sight. |
| 2. The sight systems. |
| a. The rear sight has an elevation knob with range indicators from 300 to 800 meters and two apertures for range. One aperture is marked 0-2 for short range from 0-200 meters and an unmarked aperture for normal range from 300 to 800 meters. |
| (1) The 0-2 (large) aperture is used for short range (Figure 104). This aperture is used only when the rear sight is all the way down. The 8/3 (300-meter) mark on the elevation knob is aligned with the index mark on the left side of the receiver. |
| (2) The unmarked (small) aperture (Figure 105) is used for normal range. This aperture is used for most firing situations. It is used in conjunction with the elevation knob for 300- to 800-meter targets. |
| b. The rear sight also consists of a windage knob on the rear side of the sight (Figure 106). |
| (1) Each click of the windage knob will move the strike on the round from 1/8 inch (.3 centimeters) at 25 meters to 4 inches (10 centimeters) at 800 meters. |
| (2) A windage scale is on the rear of the sight and the windage knob pointer is on the windage knob. |
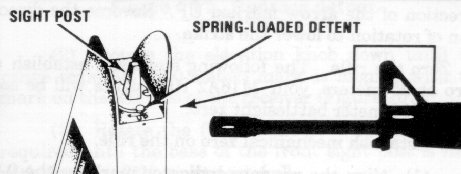
| c. The front sight consists of a rotating sight post with a spring-loaded detent (Figure 107). |

|

|

|
|
(1) The front sight is moved up or down when
zeroing the rear sight. (2) Once the rear sight is zeroed, the front sight post should not be moved. (3) Each notch on the front sight will move the strike of the bullet from 3/8 inch (0.9 centimeters) to 2 3/4 inches (7 centimeters) at 200 meters. |
|
3. Sight adjustments.
a. Rear sight. (1) To adjust windage or move the strike of the round, turn the windage knob counterclockwise to move the strike to the left and clockwise to move the strike to the right (Figure 106). |
|
(2) To adjust elevation, turn the elevation knob
until the desired range is indexed at the index mark on the left side on the sight (Figure 104). |
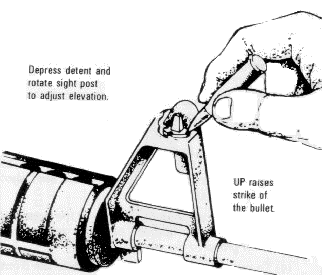
| b. Front sight. To adjust elevation, depress the detent and rotate the sight post (Figure 108). To raise the strike of the round, rotate the sight post in the direction of the arrow marked UP. Reverse the direction of rotation to lower the strike. |
| 4. Zero the rifle. The following steps will establish a zero at 25 meters, your M16A2 rifle sights will be set with a 300-meter battlesight zero. |
|
a. Establish mechanical zero on the rifle. (1) Align the windage indicator mark on the 0-2 aperture with the center line of the windage scale (the unmarked aperture is up) (Figure 106). |

|
| (2) Rotate the elevation knob down until the range scale 8/3 (300-meter) mark is aligned with the mark on the left side of the receiver (Figure 104). | |
| (3) Rotate the front sight post up or down as required until the base of the front sight post is flush with the top of the sight post well. | |
|
b. Zero at 25 meters. (1) After setting the front and rear sights to mechanical zero, the elevation knob is rotated up (clockwise) one click past the 8/3 (300-meter) mark. The elevation knob will remain in this position until the battlesight zeroing has been completed. | |
| Note: Any changes in elevation required during the zeroing procedures will be made using the front sight post only | |
| (2) Carefully aim and fire each shot of a three-shot group at the circle on the silhouette (Figure 109). | |
| (3) If your shot group is not within the circle on the silhouette, use the squares on the target to determine the required clicks to move your next shot group into the circle (Figure 109). | |
| Note: The squares are numbered around the edges of the target to equal the number of clicks required to move the shot group to the circle. | |
| (4) To raise your next shot group, rotate the front sight post UP (clockwise). To lower your next shot group, rotate the front sight post DOWN (clockwise). One click will move the strike of the round one square on the target. | |
| (5) To move the shot group to the left, turn the windage knob counterclockwise. To move the shot group to the right, turn the windage knob clockwise. Three clicks of the windage knob will move the strike of the round one square on the target. | |
| (6) Continue to fire three-round shot groups and make corrections until you have a tight shot group in the circle on the silhouette. | |
Figure 109. 25-meter zero targetDownload Printable Target (Right Click, then click SAVE AS)NOTE: Full size of target is 8-11/16 x 11-5/8 inches, the grid is 7-3/16" wide |
|
| (7) If your shot group is within the circle, your rifle is now "calibrated." | |
| (8) To place your 300-meter zero on the rifle, you must rotate the elevation knob one click counterclockwise. The 8/3 (300-meter) mark on the elevation knob should now be aligned with the index mark on the left side of the sight. | |
| Notes: 1. There are clicks between the range numbers as you turn the elevation knob. Use these clicks if you need more elevation past a certain range number to hit a target. | |
| 2. The unmarked aperture is automatically zeroed to 200 meters. Use the 0-2 aperture when shooting at night or at close ranges; for example, in an urban environment or in dense jungle. | |
| 5. Sight setting. Your rifle sights should be kept set to a combat zero of 300 meters. If you are told to engage a target at a longer range; for example, 500 meters: | |
| a. Rotate the elevation knob so that the desired range mark is aligned with the index mark on the left side of the sight. | |
|
b. Engage the
target. c. When the engagement is over, return the sight to the 300-meter setting. | |
| Note: When the rifle has been zeroed to 300 meters, all other ranges on the elevation knob are also zeroed. |